Thursday, November 16, 2023

A New Adventure - Volvo XC60

 I did a thing this week after having a 2017 RAM Laramie Longhorn for the past 5 years.  I downsized a LOT and bought a CPO 2021 Volvo XC60 Inscription.

I will miss this truck a lot, but it was the right thing to do for the future!


So here is my new to me new ride!  It has a beautiful Denim Blue color and a very nice Amber Leather Interior.  I think this will be one to last quite a long time!


The interior is the real star as far as I am concerned...


Saturday, March 18, 2023

Saturday Sweet & Savory: Chinese Garlic Sauce


Try not to eat this directly out of the container!


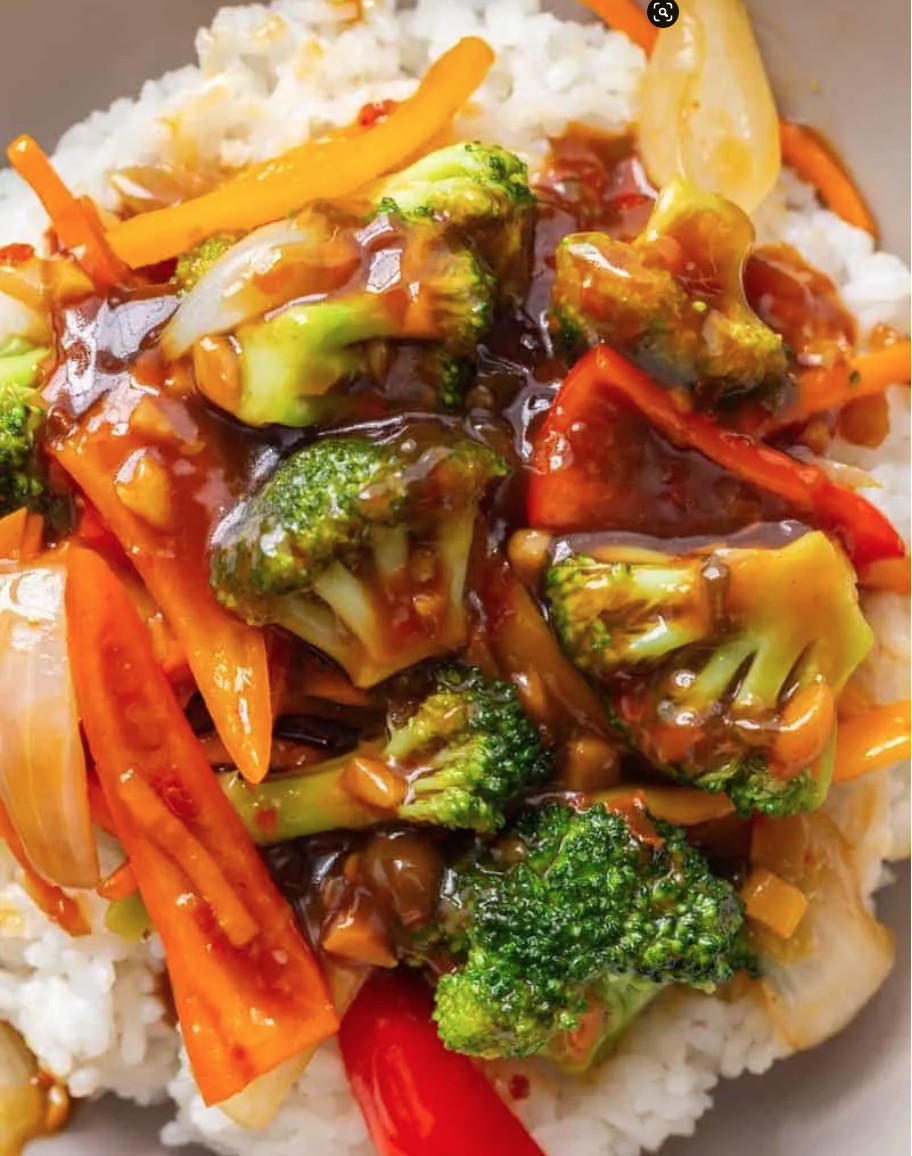
I love Asian inspired food. This Chinese garlic sauce is lightly sweet and so flavorful. It’s amazing as a stir-fry sauce or it can be used as a dipping sauce. Sometimes we use this as the final sauce when we smoke ribs and then finish or crisp them up on the grill.


I like to use it on pork smoked spareribs, or chicken wings. WARNING: It's highly addictive! I modified this recipe from one found online years ago and this is what I use all the time.

PREP TIME
15 minutes

COOK TIME
10 minutes

TOTAL TIME
25 minutes

 
Ingredients:

·       2 tablespoons vegetable or canola oil

·       2 tablespoons minced garlic

·       1 tablespoon minced ginger (I use 2 tablespoons because I like it spicier)

·       1 teaspoon finely chopped fresh green chiles (I use local Jalapenos, minced)

·       3 green onions, white and green finely minced

·       ⅔ cup soy sauce

·       ½ cup chicken broth

·       ⅓ cup rice wine vinegar

·       ¼ cup brown sugar (light or dark your choice)

·       1 ½ tablespoon sesame oil

·       1 ½ tablespoon red pepper flakes

·       ¼ cup water

·       2 tablespoons cornstarch


Directions:

1.    Heat the vegetable oil in a medium saucepan over high heat. Add the garlic, ginger, green onions and chilis. Cook, stirring constantly until fragrant, about 15 seconds.

2.     Stir in the soy sauce, chicken broth, vinegar, brown sugar, sesame oil, red pepper flakes. Bring to a boil then reduce heat to medium and cook for 1-2 minutes.

3.    Stir the water and cornstarch together until fully dissolved and pour it into the sauce. Cook, stirring constantly until the sauce thickens.


Make ahead tip:

Allow the sauce to cool for 1 hour then transfer to an airtight container and refrigerate for up to 4 days. Reheat the sauce by warming it over low heat.


It is delicious used in a simple stir fry!


Saturday, March 9, 2019

Saturday Sweet & Savory: Korean BBQ Sauce


Sometimes, home made is too much trouble. Other times, it is absolutely necessary. Case in point: Korean BBQ Sauce.


When you have a taste for something and you know you want it, it is just necessary to break all the ingredients out and go for it. 

Today I wanted Korean Style Baby Back Ribs.  I cooked the ribs with only salt & pepper in the oven until they were tender and then realized I needed the sauce! I always finish them on the grill once sauced so... here's the recipe for the sauce!

Its EASY and very quick to make:

3/4  C.     Dark Brown Sugar 
3/4  C.     Soy Sauce (Low sodium? why bother?)
1/4  C.     Water
1     T.      Rice Wine Vinegar
1.5  T.     Chili Paste (you MIGHT substitute Sriracha if you want)
1.5  Tsp.  Sesame Oil
1/2  Tsp.  Coarse Ground Black Pepper (use 2 T. so it's up to you)
1     T.      Freshly grated ginger
5 Cloves  Crushed fresh garlic
1     T.      Cornstarch
1     T.      Water

Combine the first 9 ingredients and whisk to combine.  Pour into a saucepan over high heat. While it comes to a boil, whisk together the last two ingredients, cornstarch and water, to make a slurry.  One the sauce starts to boil, pour in the slurry and whisk away. When it thickens, remove from the heat and let it cool. May be kept for up to two weeks in the fridge in an airtight container. Some people strain it but I like the chunky bits.

NOTE: I like mine a little hotter than normal so I use two Tablespoons of chili paste.

This can be brushed on ribs (or whatever - it's awesome on chicken, fish or pork) and grilled (which is how I finish my ribs) or used as a dipping sauce. Both delicious ways to consume this stuff!

Tuesday, May 1, 2018

Something New - A New Blog - White HAWL Cottage


I bought a small house in East Texas in a beautiful little tiny town called "Hideaway" to retire to one day.  I started a blog about my purchase and the renovation of the house.  Check it out here: Texas-StyleHome. It has some great before and after photos and a little narrative of the little cottage. You can also see many other photos, before, during and after the renovation at my Pinterest Board. Enjoy!


The kitchen BEFORE - dark tiny galley kitchen, no window, tired old cabinets and appliances.


Remodeled kitchen - new window over the sink, white shaker cabinets, white quartz countertops, subway tiles, white appliances! Total gut and remodel.

The BEFORE Photo - Dark deck, eaves - Generally sad with no curb appeal


The Newly Refreshed Exterior - Light Grey deck, Snow White Eaves and new gutters - a real face lift

Sunday, June 28, 2015

Eat This: Summer Herb and Tomato Focaccia


Summer Herb and Tomato Focaccia

I grow a lot of herbs and veggies in containers on my patio. Chili Piquin Peppers (RIDICULOUSLY hot TicTac sized peppers), Rosemary, Basil, Oregano, Chives, Mint, Jalapenos and cherry tomatoes. I found a recipe and changed it up a bit for a quick Sunday afternoon treat. I love focaccia and herbs and thought, "What the heck!?!" let's just marry them all together and see what comes up. Here's what I came up with.


INGREDIENTS

2 cups warm water (110 degrees F)
3 tsp yeast (1.5 packets)
2 tsp salt - I like roasted garlic grey salt
3 + 3/4 cups good quality soft bread flour
4 tablespoons extra virgin olive oil
¾ cup fresh herb leaves, chopped finely - I use Basil, Oregano and Rosemary because I grow them
1.5 Cups of small cherry tomatoes split lengthwise
1/2 cup grated cheese for sprinkling - I prefer Romano/Parmesan blend


ASSEMBLE AND BAKE

1. Preheat the oven to 110 degrees F for rising
2. Put the yeast in a large mixing bowl and pour in the warm water.
3. Add the salt and 2 cups of the flour, mix into a soft and sticky dough.
4. Add the remaining 1 3/4 cups of flour and mix well. The dough should still be sticky. You want it sticky/wet to be able to rise well
5. Cover and let rise for 40-45 minutes in the warm oven
6. Turn the dough out onto the lined pan. Add about a third of the chopped herbs to the top of the dough, fold over and add another third; fold over again
7. Press out the dough on a well oiled, or silpat lined baking sheet. Using your fingers, ease it into a rectangle, approximately 9×13, give or take.
8. Put the olive oil in a small bowl and dip your fingers into the oil, and then all over the bread, poking the bread surface and leaving little pools of oil.
9. Poke the tomatoes all over the dough pressing them in slightly., then scatter the remaining herbs across the surface. Sprinkle your chosen salt over all, and finally sprinkle on the cheese.
10. Bake for 18-20 minutes until lightly golden.
11. I like to top off the freshly baked bread with coarsely chopped Basil because it is so fragrant and sort of "melts" into the toppings.

Monday, June 8, 2015

Style: Painted and Stained Chest Makeover


Finished Product!  My $16 chest.

Last year when I went to the local County offices to vote, I had a conversation with a man who had a load of old furniture strapped to the back of his truck on the way to the Goodwill.  I saw a chest of drawers and liked its lines. I had been looking for something to sit in my entry hall and wanted a painted chest.  I talked the guy out of the chest and loaded it in the SUV. Thank goodness I had that vehicle at the time or this post wouldn't be happening.


Masked off for painting.

This chest was just an inexpensive, likely late '40's or '50's mass produced three drawer chest.  Cobwebbed and scratched, I cleaned it, rubbed it with Old English Scratch Cover and it sat in the foyer for months. 


One coat of white satin finish spray paint.

Last weekend I decided to work on it.  I removed the hardware and drawers, sanded the top and drawer fronts until they were very smooth.  I lightly sanded the sides and front of the chest to take paint.


Another light coat and we are almost done!

I'd been reading about spray painting furniture and got some satin finish white paint. I used a light Pecan poly and stain combined in one and after three coats of stain and poly on the top and drawer fronts (you can re-coat after only an hour with the fast-drying product) we were done.  I let it sit for 48 hours to cure and then, it was done.


Just about finished ... one more coat!

Not bad for a few hours work and $16 in supplies!  So I decided it's true: you CAN repurpose furniture quite easily.  I think next I am going to paint my bed frame and night stands!  Stay tuned!


I stained the drawer fronts next to each other and one right after the other to make sure I got the right amount of stain to be consistent.  It worked out well!


Sunday, January 19, 2014

Eat This: Brownie In A Mug


Busy day out and about. Football playoffs. No one wants to go to the grocery store, but there is that nagging, "Where's my chocolate?"


I've got your chocolate. 

In a mug.
Hot.
With chips.
And pecans.  

A brownie, steaming hot topped with a dollop of vanilla bean ice cream. Yeah baby.  Delicious. 

Check out how easy this is.

Ingredients (per serving):

4 Tablespoons all purpose flour
2 Tablespoons butter
2 Tablespoons sugar
2 Heaping tablespoons chocolate chips
2 Heaping tablespoons chopped pecans
1 Tablespoon cocoa powder
1 Tablespoon packed brown sugar
1 Egg yolk (no white)
1 Pinch salt (if using salted butter omit this)
1/4 Teaspoon vanilla extract

Melt butter in the mug in microwave.  Stir in sugars until well combined.  Add egg yolk and vanilla and stir.  Add flour, cocoa and salt, if using, and stir to combine.  Add chips and pecans.


Microwave for one minute on full power. Do not over cook. It will be moist in the center. Let sit for three minutes, if you can, before topping with a scoop of vanilla ice cream.


Delicious.  
Not for the faint of heart. 
Not diet food. 
Just delicious.


Sunday, September 15, 2013

Eat This: Pickled Peppers


Each year I grow herbs and peppers in my backyard in containers.  This year, I planted two tiny little jalapeño pepper plants I bought from the Home Depot back in March.  I think I paid $1.50 for each and by September they are 3.5 feet tall and producing lots of peppers.

I leave them on the plant until they turn red and then harvest and keep in the refrigerator until I have enough. I think they taste better than the green peppers, maybe more mellow?  For this recipe, I used a few large green jalapeños from the market to add some color.  These are definitely not like my Cowboy candy.  These are pickles. Great on a sandwich or as a, well, pickle!

Check em out.


Monday, September 2, 2013

Eat This: Herbed Focaccia


This summer we used a lot of the herbs we grow in the back yard.  Basil, rosemary, lemon thyme, German thyme, chives, mint and oregano.  I wanted some focaccia to use to make our favorite "Caprese sandwich" using more of the nice basil we have as well as some delicious tomatoes from the farmer's market.

I used an old tried and true quick focaccia recipe.  It turns out really well and doesn't take forever.  Quick and easy, almost fool proof try this and use anything you want to include as an add on.


Sunday, September 1, 2013

Eat This: Blackberry Raspberry Cobbler


Between the blackberry bounty at the farmer's market and the special on raspberries at the grocery store, tonight's dessert is cobbler. Delicious, tart locally grown blackberries were HUGE.  I used my old standby cobbler recipe to hook them both up together and the result was outstanding.  Quick, easy and idiot-proof (I'm walking proof of that!)  Check this out:

Ingredients:

2 Cups fresh blackberries
1 Cup fresh raspberries
1/2 Stick butter
1 Cup Sugar
1 Cup all purpose flour
1 Cup milk
1 1/2 Teaspoons baking powder
1/2 Teaspoon salt
1 1/2 Teaspoons cinnamon

Preheat oven to 350 degrees.  Butter a baking dish generously.  Melt the stick of butter.

Combine sugar, flour, baking powder, cinnamon and salt in a mixing bowl.  Add the milk and mix.

Add the melted butter and combine until incorporated.  Pour into baking dish.

Distribute the berries over the top evenly. Sprinkle with a couple of tablespoons of sugar if you like a more crispy top.

Bake for an hour.  Look at sides on the top and if they are puling away, it's done.  If not give it another 5 minutes but no more.  

Remove form oven and allow to cool.  Serve warm or at room temp.  I personally love this the second day when it is ice cold.  refrigerate leftovers (if there are any).

Wednesday, August 21, 2013

Eat This: Arborio Rice Stuffed Tomatoes


It's that time of year. Tomato season.  Tonight I made Arborio rice stuffed tomatoes. They are light, refreshing and taste like summer.  Easy to make, it takes more time to prep than to bake. Here is how it works.


Tuesday, August 20, 2013

Eat This: Orange Pound Cake


One of my favorite cakes is Lemon Pound Cake. The one I made and posted HERE was well received by friends and family alike.  Coming from Florida, I love citrus.  I have posted recipes for orange marmalade, clementine marmalade and use lemon quite liberally.  Today I thought I would try the same recipe with orange as the flavor note.  It turned out nicely.  More subtle than lemon, but delicious as well.  


I also used two loaf pans this time instead of using the vintage cast aluminum Bundt pan that belonged to my grandmother.  I cooked these for one hour at 325 degrees.  It pulled away from the pan and came clear with the toothpick test.  Don't overcook.  Be sure you let the cakes cool for about 15 minutes before turning them out for the glaze.

One for us and one for a neighbor who always brings us nice food and is just a general, all around good guy.  We love to share and this is perfect for that.

The changes?  Use orange extract instead of lemon and I used the zest from the orange in the glaze as well.  Using a micro plane makes it easy!  Enjoy.

Wednesday, July 31, 2013

Eat This: Easy Peasy Fajitas


Everyone in Texas has their own recipe for fajitas.  Well, almost everyone.  Mine is pretty simple.  I think many fajitas I've had over the years are unnecessarily complicated flavor-wise. Try these and I promise you will make your own take on them as well.  I am afraid the only process photos I have are cooking photos.  I had a lot going on today and the prep isn't necessarily photo worthy anyway!  Try this.

Saturday, July 27, 2013

Savor The Summer: Garlic Ginger Pepper Jam


I love the taste of Summer from the fresh corn to the nice fiery hot Jalapenos I grow in the back yard.  I also like grilled meats and think that once in awhile you might like to have something sweet and hot on a freshly grilled chop.  Enter this jam.


Friday, July 19, 2013

Eat This: Fish Friday - Maple Mustard Salmon

Stone Ground Mustard and Maple Glazed Salmon


I love salmon. When the wild caught, Copper River Salmon is available, I am always a step away from a feast.  Tonight, I made something a little different; Mustard-Maple Glazed Roasted Salmon.  It was DELICIOUS and so easy. 

Sadly, I was very lazy and only have the final product photographed, but I'll walk you through the process.

Saturday, July 13, 2013

Eating This: Fresh from Southern California

Riverside Farmer's Market


I have been on a bit of a mini-vacation in Southern Calirofnia, hosted by friends in Riverside at their home.  The setting is idyllic, really beautiful and I know why they love being here so much.  Food is important here:  Fresh food. Local food. Delicious food.  Our dinners have been really extraordinary.  Here are some photos of the fresh products from their garden and the local Farmer's Market and the resulting meal!

Saturday, July 6, 2013

Eat This: Fresh Blueberry Jam


Hello.  My name is Marc and I am a canning and preserving addict.  


I admit it.  Don't want to change it. Enjoy doing it and sharing with friends and neighbors.  Today I made fresh blueberry jam.  The blueberries came from a local farm here in North Texas and bought at the local Farmer's Market.  I water processed the results and it turned out great!  Next time I think I will do some spicy version, maybe a Jalapeño or other pepper infused variety.

Fresh Saturday: Purple Hull Peas For The Freezer


I love peas. Almost any kind.  When I was at the Denton Farmer's Market a couple of weeks back, one of the vendors I buy from was taking orders for Purple Hull Peas.  He has a family farm and grows a pretty large variety of things.  I ordered a half bushel of peas and they came in on the 4th!  It was amazing that farmers were in the market on the Fouth of July, but hey, that's their bread and butter and they were mobbed.  I also bought Blueberries which you will see in a subsequent post.

Wednesday, July 3, 2013

Eat Here: Coco Pazzo Cafe, Chicago


From the website - Try sitting outside and enjoy the neighborhood ambiance.

Last week I was in Chicago attending the American Library Association's "Annual Conference".  26,000 librarians, vendors and others converged on Chicago.  No surprise, a lot of Tweets, FaceBook and blog posts revolved around food.  Chicago has a long tradition of foods from everywhere you can imagine.


The Modigliani inspired murals high above head are just a small part of the ambiance.


Tuesday, July 2, 2013

Grow: Herbs and More

Lemon Thyme, German Thyme and Lavender

Living in North Texas we get some pretty extreme weather.  From ice and snow in the Winter to triple digit temps in the Summer.  So I do what any right minded person would do: I do container gardening on the patio.  Easy. Cheap. Manageable. So much less maintenance, and, when the weather gets dicey?  I move them under cover with no trouble.


Sweet Basil
I bought one basil plant at the Home Depot for $3 and we have been eating off this monster all season.  From caprese salads, to sandwiches and salads, it is a Summer staple we love each year.

Saturday, June 22, 2013

Southern Style: Sweet & Savory Tomato Jam


FROM THIS ....
TO THIS ...


When sweet meets savory, delicious explosions happen. It's nature. Go with it.  I love Summer; tomatoes, sweet and delicious.  I want to save it for myself and to share with everyone I know.  I found a tomato jam recipe, but it didn't really fit the flavor profile I was looking for. So I did what anyone would do: I made up my own.  This is the result.  Try it.  The only thing it costs you is an afternoon.

Saturday, June 15, 2013

Eat This: Peach Apricot Ginger Jam

Peach Apricot Ginger Jam


I love the fresh fruit taste of the Spring.  I went to the Farmer's Market and brought back some beautiful peaches, grown here in the DFW area. I knew I wanted something special, so I am paring them with dried Turkish apricots and ginger. Sweet and spicy with the ginger.  It's delicious.  This is a lower sugar recipe as well. The original called for 7 cups of sugar. I used 2 1/2.  The use of Low-No Sugar Pectin has changed the way preserving works!  Try this.

Saturday, June 8, 2013

Eat This: Rosemary Oregano Parmesan Focaccia


Impossible not to cut a piece to taste.
I love focaccia.  I bought a loaf last week from a local grocery. It was delicious, creamy with Parmesan.  I wanted to try that myself and this was the result.  I added herbs fresh from my backyard, rosemary and oregano along with shaved parmesan.  Oh yeah. Delicious.  Just try to make at least two loaves because one?  Like eating one potato chip. Not happening.

Wednesday, May 29, 2013

Eat This Now: Strawberry Lemon Ginger Jam


I love strawberries.  Sweet. Tart. Pretty. Red.  Come on, everyone likes strawberries, right?  I've been on a jelly/canning/preserving kick over the past year and I thought, what could I do with strawberries?  These Texas grown berries are delicious. They're pretty BIG too.  I took a basic recipe from Susan Can Cook and modified it a bit.  It came out really nicely.  Delicious and tastes like "Summer".  Try this. It's easy and delicious.

Saturday, May 25, 2013

Let's Eat Cake: Lemon Pound Cake


I love lemon anything. Cake. Cookies. Whatever.  I found a recipe and modified it and this was the outcome.  I gave our neighbors half of the cake, so I wouldn't eat it all, and they proclaimed it the best lemon cake they'd ever had.  You be the judge. It really WAS pretty awesome.  It is a basic cake that you can add any kind of extract and make it your own.  Enjoy.